Continuous Integration
Adding Happo to your Continuous Integration setup is the best way to catch visual regressions early. Happo will compare your PRs with the base branch and let you know exactly what has changed in your UI.
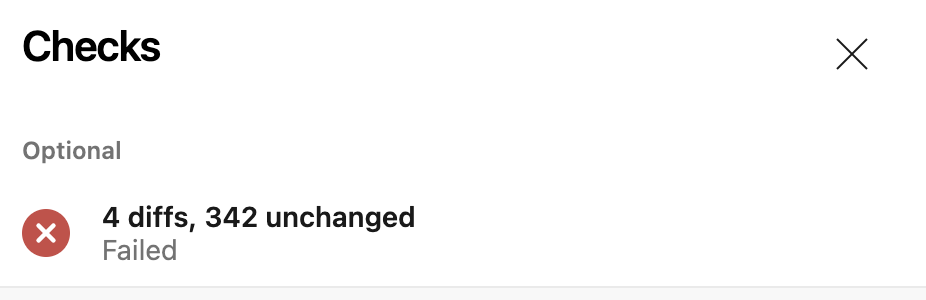
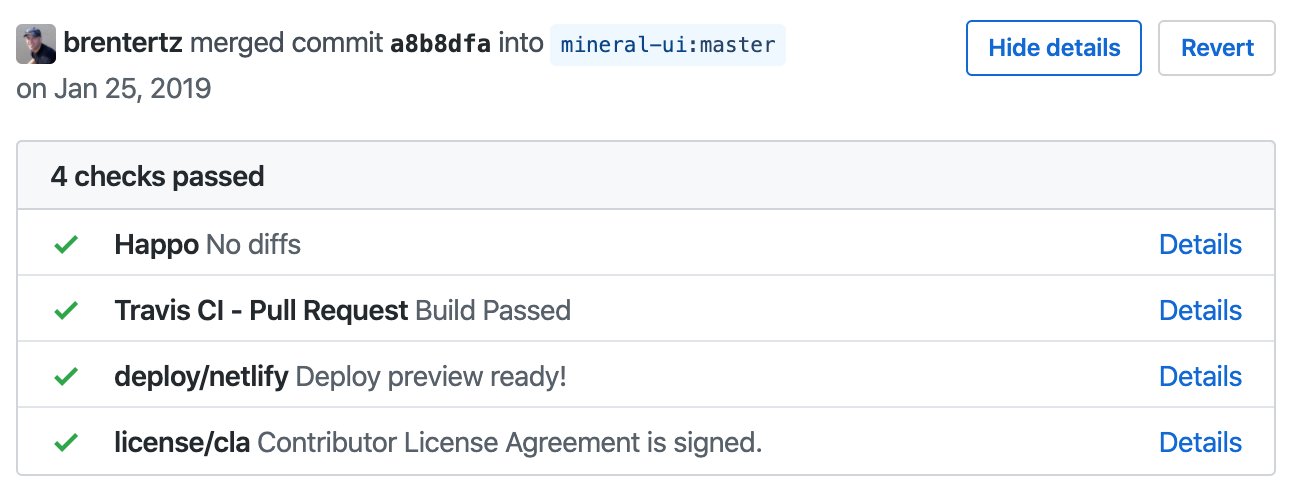 Example of a Happo status posted to a GitHub pull request.
Setup
The instructions on this page apply to all integrations except the Cypress and Playwright integrations. Refer to the Cypress integration page and the Playwright integration page for instructions on how to integrate with CI there.
Since a lot of projects follow a pull-request/merge-request model, Happo
provides a unified CLI command that automatically detects CI environments. The
main happo CLI command will:
- Figure out the right baseline report to compare with, starting at the merge base for the pull request branch
- Create a Happo report for the current HEAD commit
- Compare the baseline report with the new report
- If allowed to, post back a status to the commit/PR
The CLI auto-detects the following CI environments:
- GitHub Actions
- Circle CI
- Travis CI
- Azure DevOps
If your CI environment is not listed here or if you run into any issues, please reach out to support@happo.io and we will help you get things set up.
GitHub Actions
This script knows about the
GitHub Actions build environment,
assuming a PR based model. To run it, configure your workflow file to run the
happo command. Here's an example:
name: Happo CI

on:
  push:
    branches: [main]
  pull_request:

jobs:
  happo:
    runs-on: ubuntu-latest
    steps:
      - uses: actions/checkout@v4
        with:
          ref: ${{ github.event.pull_request.head.sha || github.ref }}
          fetch-depth: 100
      - name: Fetch main branch
        if: github.ref != 'refs/heads/main'
        run: git fetch origin main:main
      - uses: actions/setup-node@v4
      - run: npm ci
      - run: npx happo
        env:
          HAPPO_API_KEY: ${{ secrets.HAPPO_API_KEY }}
          HAPPO_API_SECRET: ${{ secrets.HAPPO_API_SECRET }}
Make sure that the workflow is configured to run on pushes to your default branch. This will ensure that baselines exist for PR builds to compare against.
Circle CI
The happo script knows about the CircleCI build environment, assuming a PR
based model. To run it, configure .circleci/config.yml to run the happo
command. Something like this:
jobs:
  build:
    docker:
      - image: cimg/node:lts
    steps:
      - checkout:
          method: full

      - run:
          name: happo
          command: npx happo
The happo command assumes your PRs are based off of the main branch. If
you're using a different default branch, you can set the --baseBranch
argument.
jobs:
  build:
    docker:
      - image: cimg/node:lts

    steps:
      - checkout:
          method: full

      - run:
          name: happo
          command: npx happo --baseBranch origin/main
Azure DevOps
The happo script knows how to resolve variables from
Azure Pipelines.
It can be used with pull requests and regular pushes. To run it, configure
azure-pipelines.yml to run the happo command.
In the example below the HAPPO_API_KEY and HAPPO_API_SECRET environment
variables are populated from two
user-defined secret variables.
trigger:
  - main
pool:
  vmImage: ubuntu-latest
steps:
  - task: NodeTool@0
    inputs:
      versionSpec: '22.x'
    displayName: 'Install Node.js'
  - script: |
      npm ci
      npx happo
    displayName: 'Install dependencies and run Happo'
    env:
      HAPPO_API_KEY: $(happoApiKey)
      HAPPO_API_SECRET: $(happoApiSecret)
The trigger is set to run for pushes to the main branch. You'll have to
replace this if you are using a different default branch. To trigger builds for
pull requests, you can use
a branch policy for the main branch.
Travis CI
This script knows about the Travis build environment, assuming a PR based model.
To run it, configure .travis.yml to run the happo command:
language: node_js
script:
  - npx happo
The happo command assumes that your PRs are based off of the main branch. If
you're using a different default branch, you can set the --baseBranch
argument.
language: node_js
script:
  - npx happo --baseBranch origin/master
Generic CI
If you are using a different CI service, you'll have to set a few different CLI
arguments when invoking the happo command:
--beforeSha- the SHA of the baseline commit--afterSha- the SHA of the current HEAD--link- a URL that links back to the change (further instructions)
Posting build statuses
Your Happo account can be configured to post build statuses to your PRs/commits. Happo currently integrates with GitHub, Bitbucket, and Azure DevOps. See specific instructions for the different providers below.
GitHub
The instructions in this section only work if you are using github.com or the on-premise version of happo.io. If you're using a local GitHub Enterprise setup, there is an alternative solution described in the next section
Step 1: Install Happo GitHub app
First you need to install the Happo GitHub App in the repository/repositories you want to run Happo in.
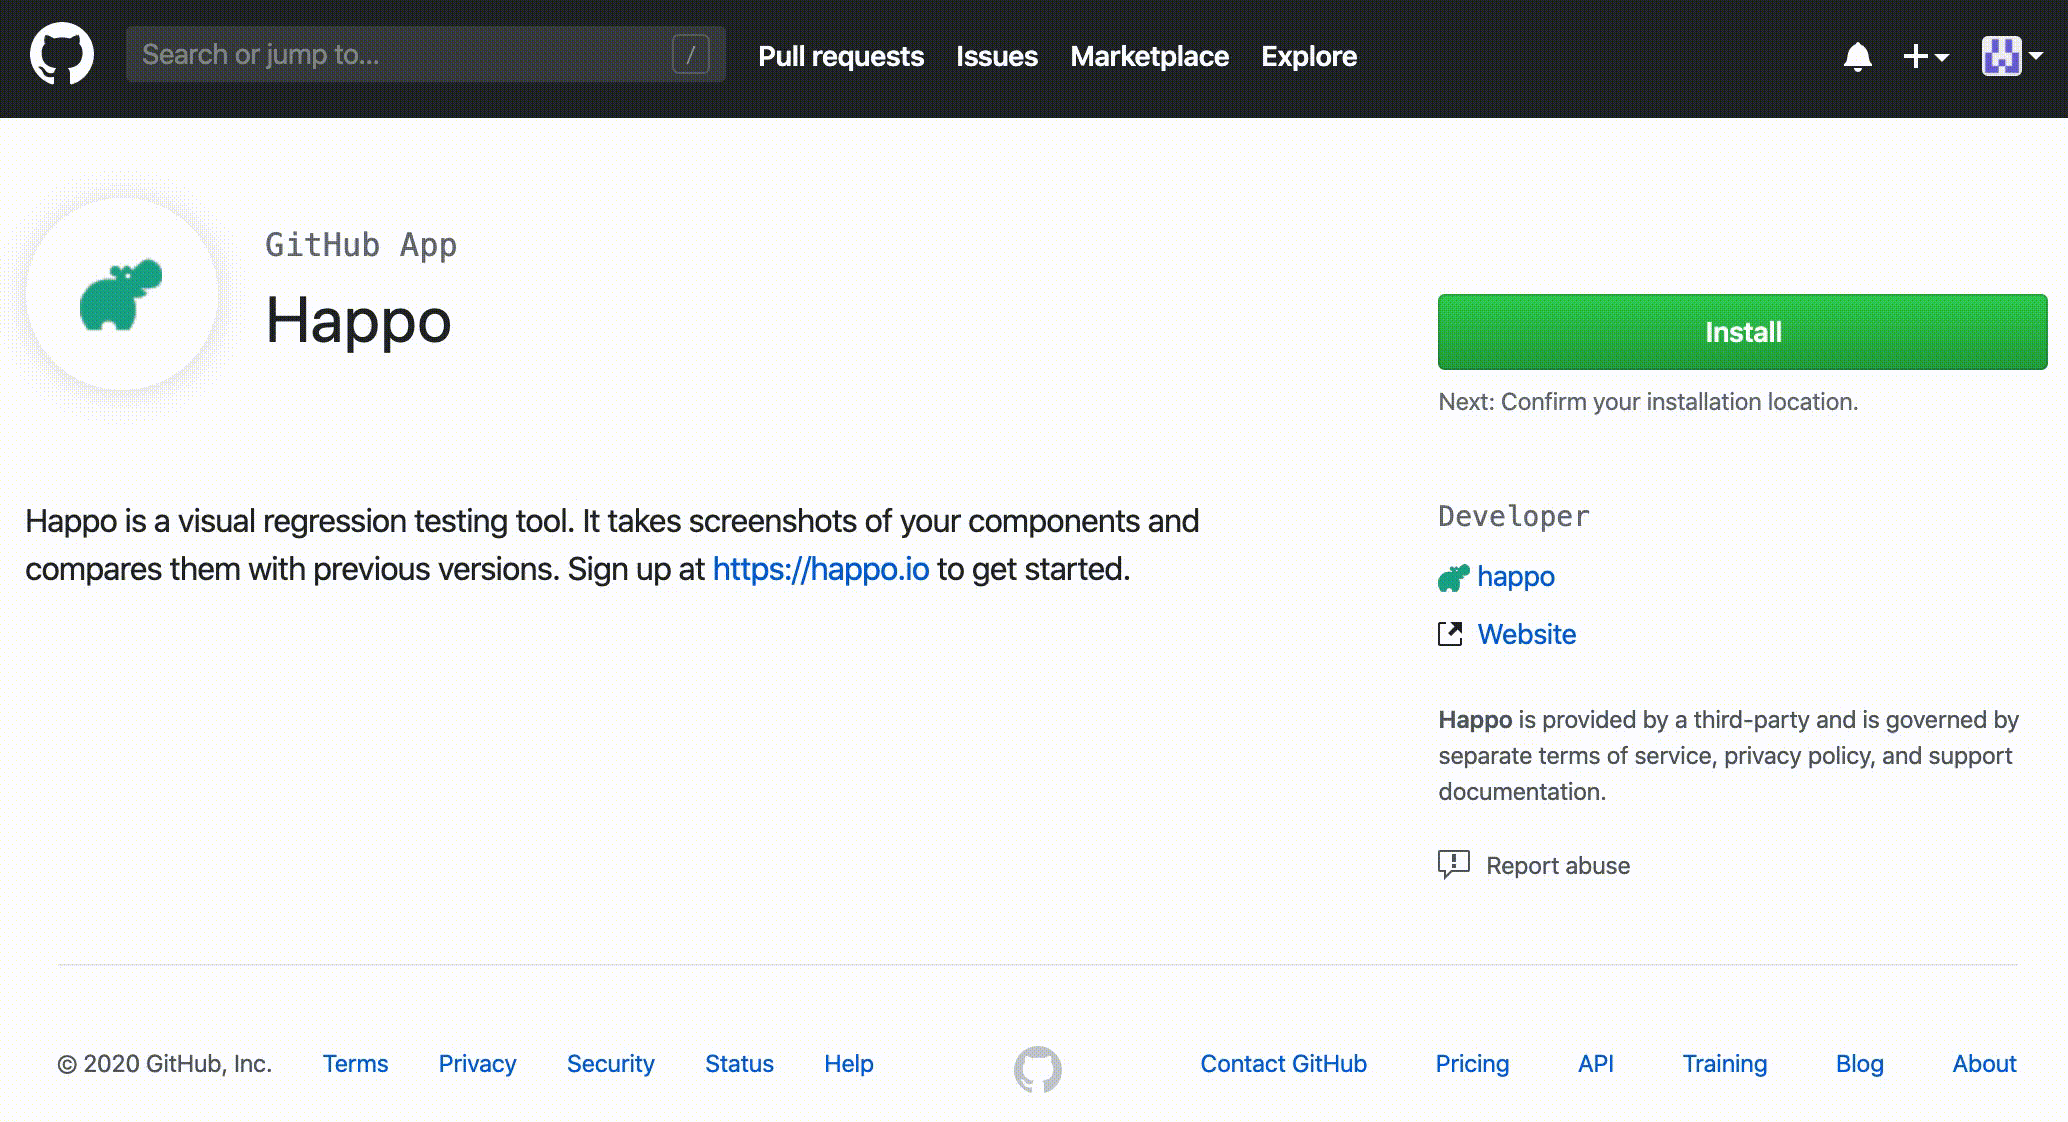 Installing the
Happo app at https://github.com/apps/happo
Installing the
Happo app at https://github.com/apps/happo
Step 2: Connect with repository
Once you have the Happo GitHub app installed, you need to connect/activate the right repository with your Happo account on the GitHub integration page on happo.io. Once you're done with that, you're all set to have Happo automatically post statuses on your PRs/commits.
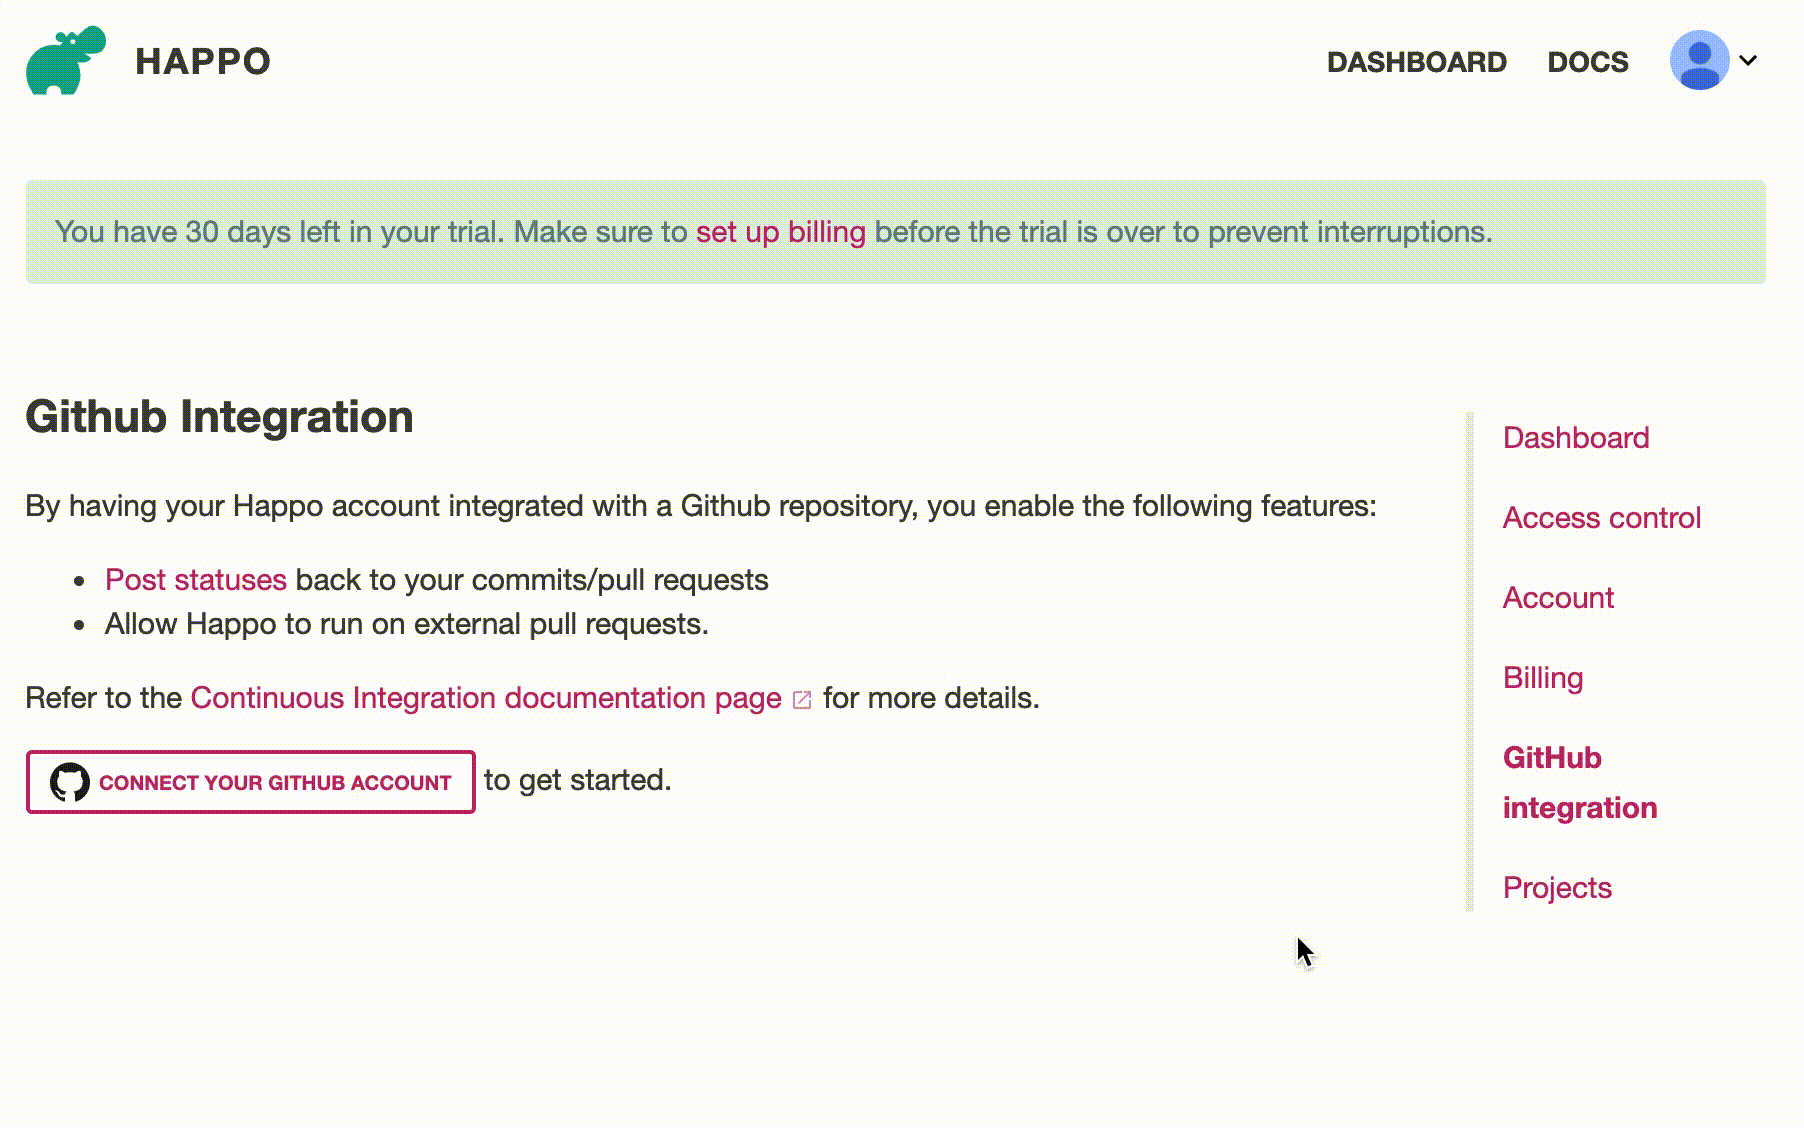 Activating the GitHub repository at https://happo.io/github-integration
Happo build statuses
Here's what it looks like when Happo posts a status on a pull request:
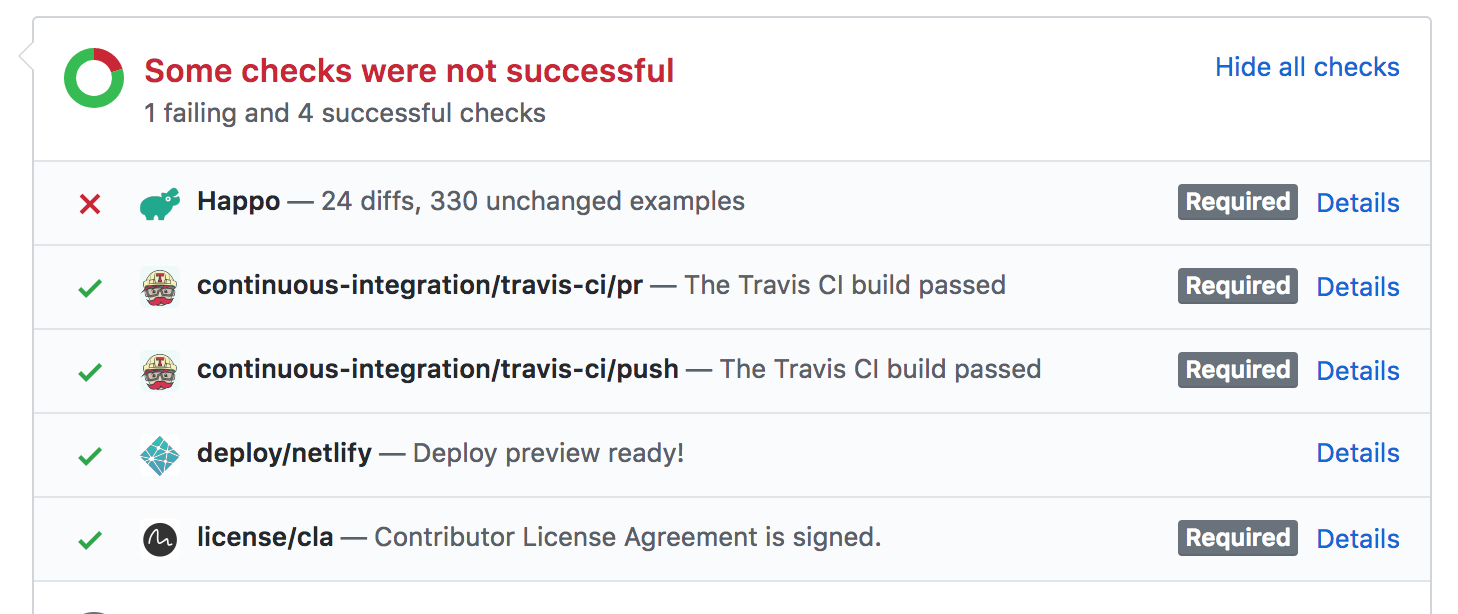
If there is a diff, the status will be set to failure. To manually flip this to a success status, just go to the Happo comparison page (linked to by the "Details" link next to the Happo status) and click the Accept button at the top.
The status over on github.com will then change to success (green) for the PR/commit.
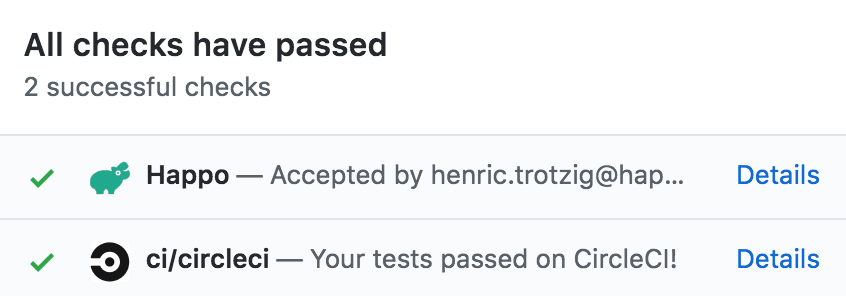
If there are no diffs, the status is automatically set to success.
Posting statuses without installing the Happo GitHub App
If you for some reason can't install the Happo GitHub App (e.g. when using
GitHub Enterprise) you can still get the Happo status posted to your PR -- as a
comment on the pull request. To get this working, you have to provide the Happo
CI script with either a HAPPO_GITHUB_TOKEN auth token or
HAPPO_GITHUB_USER_CREDENTIALS containing a username and a personal access
token.
If you are using GitHub Actions, the easiest thing is to set the
HAPPO_GITHUB_TOKEN based on the automatically provided
secrets.GITHUB_TOKEN variable.
env: HAPPO_GITHUB_TOKEN=${{ secrets.GITHUB_TOKEN }}
If you are not in a GitHub Actions environment, you can instead use a personal access token:
HAPPO_GITHUB_USER_CREDENTIALS="trotzig:21A4XgnSkt7f36ehlK5"
Here's a guide from github.com on how to generate the personal token.
The environment variable must contain both the username of the profile and the personal access token, separated by a colon.
If you're using GitHub Enterprise, apart from defining the environment variable
you also need to add
githubApiUrl to .happo.js.
Bitbucket
To allow Happo to post build statuses to your Bitbucket repo, you need to configure Happo with an API token or a Repository access token.
Step 1: Generate a token
Alternative A: API Token
On your
API tokens page for your profile,
generate
a scoped API token
with the scope read:repository:bitbucket.
 Generating a scoped Bitbucket API token through the Bitbucket UI
Alternative B: Repository access token
On your repository settings page, go to Security > Access tokens. Generate a
token with the Repositories > Read scope.
 Generating a repository access token through the Bitbucket UI
Step 2: Fill in form at Happo
Once you have the API token, you can go to the
Bitbucket integration page on happo.io
and fill out the form. If you have an API token, set the email field to your
bitbucket account email. If you have a repository access token, set the email
field to x-token-auth. When you're done with filling out the form and the
connection is working, you're all set to have Happo automatically post statuses
on your PRs/commits.
Happo build statuses
Here's what it looks like when Happo posts a status on a pull request:
If there is a diff, the status will be set to failure. To manually flip this to a success status, just go to the Happo comparison page (linked to from the status) and accept the diffs.
The status over on bitbucket.org will then change to success (green) for the PR/commit. If there are no diffs, the status is automatically set to success.
Azure
Step 1: Generate a Personal Access Token (PAT)
To authorize Happo to post statuses to your PRs/commits, you need to generate an Personal Access Token.
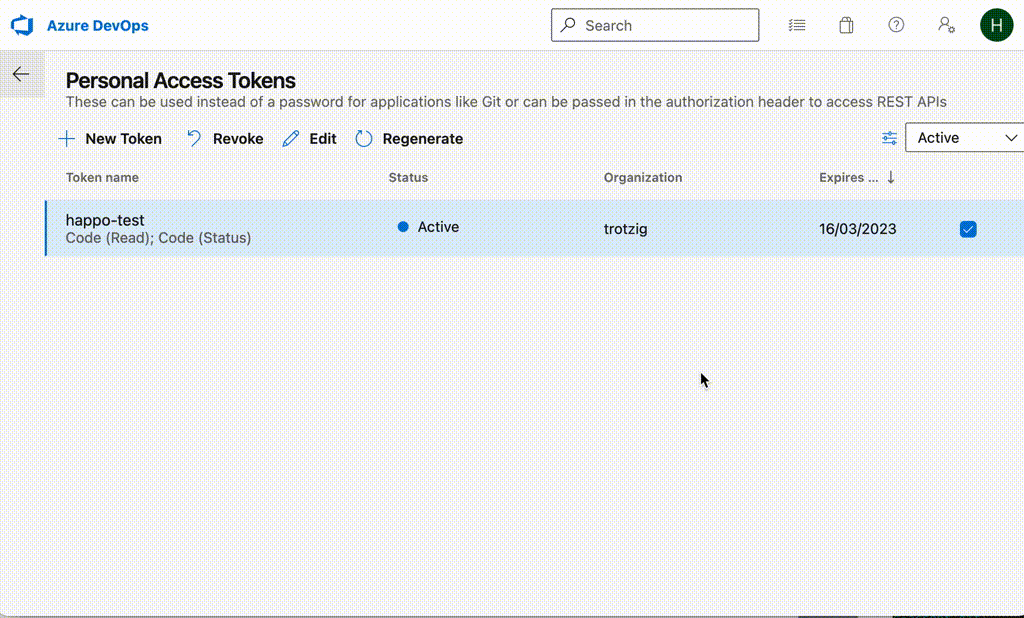 Generating a Personal Access Token through the Azure UI
Set the "Code" scope to Read and Status. We need the read scope to figure
out the right baseline reports to use. The status scope is used when posting
build statuses to PRs.
Step 2: Fill in form at Happo
Once you have the PAT, you can go to the Azure integration page on happo.io and fill out the form. Once you're done with that, you're all set to have Happo automatically post statuses on your PRs/commits.
Happo build statuses
Here's what it looks like when Happo posts a status on a pull request:
If there is a diff, the status will be set to failure. To manually flip this to a success status, just go to the Happo comparison page (linked to from the status) and accept the diffs.
The status over on Azure DevOps will then change to success (green) for the PR/commit. If there are no diffs, the status is automatically set to success.
Email notifications
You can set up the CI integration to send email notifications when comparison
reports are ready. Set the --notify CLI argument to one or more
(comma-separated) email addresses and emails will be sent from Happo when
results are available.
npx happo --notify user@example.com
If you want to send the email to the person responsible for the change/PR that
triggered the Happo tests, you can do that via a git show one-liner. Here's an
example for GitHub Actions:
- run: npx happo --notify $(git show -s --format=%ae HEAD)
Multiple recipients
Use a comma-separated list of email addresses to send the notification to several recipients:
npx happo --notify user@example.com,service-account@mycompany.com
Setting the right link
The --link argument is used to contextualize the report. Happo will link back
to the --link URL whenever the report is shown. Some good examples of links to
use:
- A URL that leads to the pull request/merge request that started the build
- A link to the commit associated with the build